Install Portworx on PKS using the Operator
Prerequisites
Ensure that your Tanzu cluster meets the minimum requirements for Portworx.
Configure your environment
Follow the instructions in this section to configure your environment before installing Portworx.
Enable privileged containers and kubectl exec
Ensure that the following options are selected on all plans on the TKGi tile:
- Enable Privileged Containers
- Disable DenyEscalatingExec (this is useful for using
kubectl execto runpxctlcommands)
Configure Bosh Director addon
Bosh Director ensures the upgrades to Portworx TKGI clusters are performed with minimal disruption to the cluster's availability and functionality.
In the process of stopping and upgrading instances within a TKGI cluster, it is responsible for unmounting the /var/vcap/store directory. However, Portworx employs /var/vcap/store/opt/pwx/oci as the root filesystem for its OCI container, which is essential for the operation of the runc container.
To enable zero downtime upgrades for Portworx TKGI clusters, it is important to stop Portworx and unmount /var/vcap/store/opt/pwx/oci. This step allows Bosh Director to proceed smoothly with the task of stopping the instances.
Perform these steps on any machine where you have access to the Bosh CLI.
Upload a Portworx release to your Bosh Director environment
Run the following command to clone the
portworx-stop-bosh-releaserepositories:git clone https://github.com/portworx/portworx-stop-bosh-release.git
cd portworx-stop-bosh-releaseCreate the Portworx release with a final version (in this example, version 1.0.0) using the Bosh CLI:
mkdir src
bosh create-release --final --version=1.0.0
Upload the release to your Bosh Director environment (replace
director-environmentwith your actual environment):bosh -e director-environment upload-release
Add the Addon to the Bosh Director
Get your current Bosh Director runtime config:
bosh -e director-environment runtime-configIf this is empty, you can simply use the runtime config at runtime-configs/director-runtime-config.yaml.
If you already have an existing runtime config, add the release and addon in runtime-configs/director-runtime-config.yaml to your existing runtime config.
Once you have the runtime config file prepared, update it in the Director:
bosh -e director-environment update-runtime-config runtime-configs/director-runtime-config.yaml
Apply the changes.
After the runtime config is updated, navigate to your Operations Manager Installation Dashboard and click Apply Changes. This will ensure Bosh will add the addon on all new VM instances.
If you already have an existing Portworx cluster, you will need to recreate the VM instances using the bosh recreate command.
Architecture
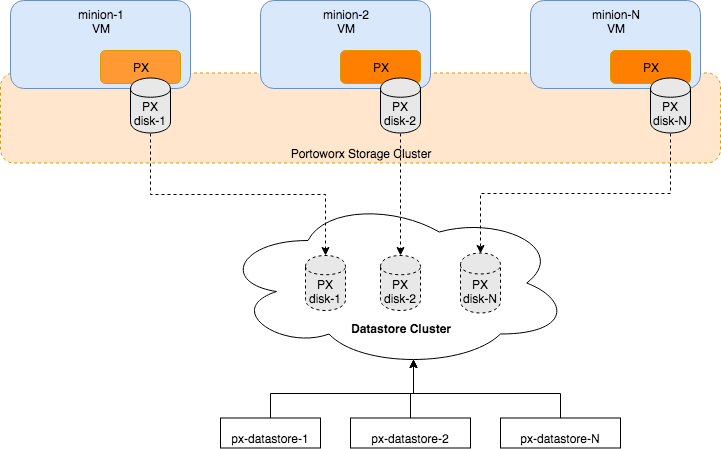
The following diagram gives an overview of the Portworx architecture on vSphere using shared datastores.
- Portworx runs on each Kubernetes minion/worker.
- Based on the given spec by the end user, Portworx on each node will create its disk on the configured shared datastores or datastore clusters.
- Portworx will aggregate all of the disks and form a single storage cluster. End users can carve PVCs (Persistent Volume Claims), PVs (Persistent Volumes) and Snapshots from this storage cluster.
- Portworx tracks and manages the disks that it creates. In a failure event, if a new VM spins up, Portworx on the new VM will be able to attach to the same disk that was previously created by the node on the failed VM.
Install the Operator
Enter the following kubectl create command to deploy the Operator:
kubectl create -f https://install.portworx.com/?comp=pxoperator
ESXi datastore preparation
Create one or more shared datastore(s) or datastore cluster(s) which is dedicated for Portworx storage. Use a common prefix for the names of the datastores or datastore cluster(s). We will be giving this prefix during Portworx installation later in this guide.
Step 1: vCenter user for Portworx
You will need to provide Portworx with a vCenter server user that will need to either have the full Admin role or, for increased security, a custom-created role with the following minimum vSphere privileges:
- Datastore
- Allocate space
- Browse datastore
- Low level file operations
- Remove file
- Host
- Local operations
- Reconfigure virtual machine
- Virtual machine
- Change Configuration
- Add existing disk
- Add new disk
- Add or remove device
- Advanced configuration
- Change Settings
- Extend virtual disk
- Modify device settings
- Remove disk
If you create a custom role as above, make sure to select "Propagate to children" when assigning the user to the role.
All commands in the subsequent steps need to be run on a machine with kubectl access.
Step 2: Create a Kubernetes secret with your vCenter user and password
Get VCenter user and password by running the following commands:
- For
VSPHERE_USER:echo '<vcenter-server-user>' | base64 - For
VSPHERE_PASSWORD:echo '<vcenter-server-password>' | base64
Note the output of both commands for use in the next step.
- For
Update the following Kubernetes Secret template by using the values obtained in step 1 for
VSPHERE_USERandVSPHERE_PASSWORD.apiVersion: v1
kind: Secret
metadata:
name: px-vsphere-secret
namespace: <px-namespace>
type: Opaque
data:
VSPHERE_USER: XXXX
VSPHERE_PASSWORD: XXXXApply the above spec to update the spec with your VCenter username and password:
kubectl apply -f <updated-secret-template.yaml>
Step 3: Generate the specs
Navigate to Portworx Central and log in, or create an account.
Select Portworx Enterprise from the product catalog and click Continue.
On the Product Line page, choose any option depending on which license you intend to use, then select Continue to start the spec generator.
For Platform, select vSphere. Specify your vCenter IP or host name and the prefix of the datastore that Portworx should use.
For Distribution Name, select OpenShift4+, then click Save Spec to generate the specs.
Apply the specs
Apply the generated specs to your cluster.
kubectl apply -f px-spec.yaml
Monitor the Portworx nodes
Enter the following
kubectl getcommand and wait until all Portworx nodes show as ready in the output:kubectl -n kube-system get storagenodes -l name=portworxEnter the following
kubectl describecommand with the name of one of the Portworx nodes to show the current installation status for individual nodes:kubectl -n kube-system describe storagenode <portworx-node-name>Events:
Type Reason Age From Message
---- ------ ---- ---- -------
Normal PortworxMonitorImagePullInPrgress 7m48s portworx, k8s-node-2 Portworx image portworx/px-enterprise:2.5.0 pull and extraction in progress
Warning NodeStateChange 5m26s portworx, k8s-node-2 Node is not in quorum. Waiting to connect to peer nodes on port 9002.
Normal NodeStartSuccess 5m7s portworx, k8s-node-2 PX is ready on this nodenoteIn your output, the image pulled will differ based on your chosen Portworx license type and version.